
A quick guide to convert a word document into a template, upload & retrieve a file ID, and add a merge button to a Page Layout!

If you’re reading this you probably already installed Mambo Merge but, if you haven’t, head over to the Mambo Merge website to download the latest edition straight from the AppExchange. And, if you ever have any questions, feel free to send them our way to support@mambomerge.com. Who knows, if it’s a common enough question, you’ll probably end up seeing the answer on our support page soon too!
Today we’re going to walk through getting up and running fast in Mambo Merge, after installation. We’ll begin by working on a template, so Mambo Merge has something to populate with that Salesforce data.
Convert a Document into a Mambo Merge Template
To begin, we’ll open up Microsoft Word, take a sample opportunity document (or in your case, maybe the most recent version of whatever document you’re trying to template-ize), and start replacing the relevant words with merge fields related to the data in Salesforce.
So I’ve replaced, for instance, today’s date with the merge field function {{TODAY()}} using the double curly brace notation, which is what we typically recommend. I’ve also replaced the opportunity and owner first and last name using a dot notation in order to identify each field within its corresponding object {{Account.Name}}, {{Owner.FirstName}} {{Owner.FirstName}}.
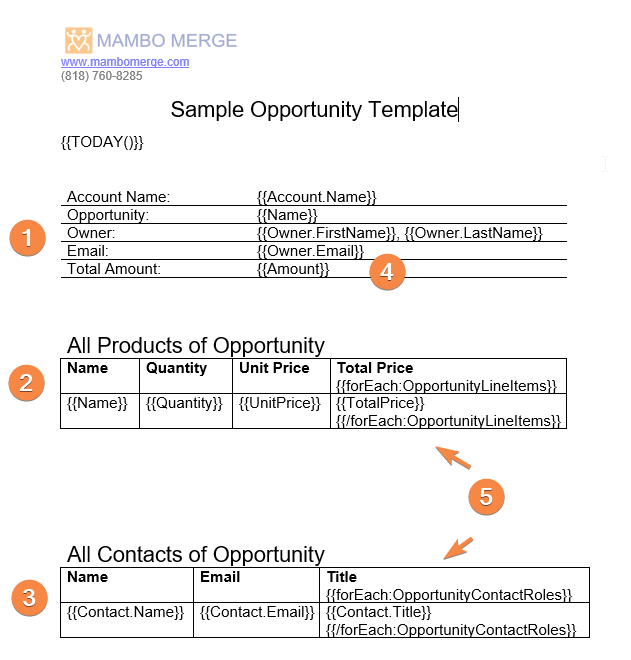
Often when using Microsoft Word it will hint “Hey, this is a misspelling” or “This does not seem to be correct grammar.” We always recommend selecting “ignore” to those statements and making them disappear since the little red squiggly lines don’t always play nicely with Salesforce.
In the table labeled “All Products of Opportunity”, we use a {{forEach:OpportunityLineItems}} statement to loop through each opportunity line item to retrieve the name, quantity, unit price and total price for each line item. Similarly, in the table labeled ““All Contacts of Opportunity” we use another {{forEach:OpportunityContactRoles}} loop to display all contacts for the opportunity. Basically anything between the forEach tags is going to be repeated once per record within the related list.
To finish template-izing a document simply replace all the desired fields in the doc with Merge fields and you’ll be all set!
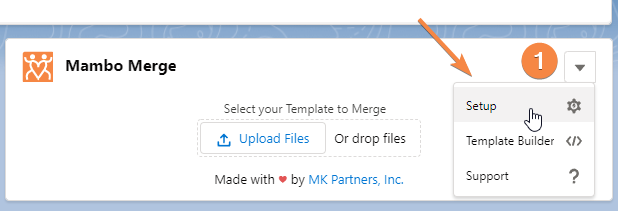
But how do you know what merge field to use? Since this was an opportunity template we will go to an opportunity record where Mambo Merge is installed and click on the down arrow to choose Template Builder.
This will show us all the options available through an object or field combination along with complex ones such as related lists and functions.
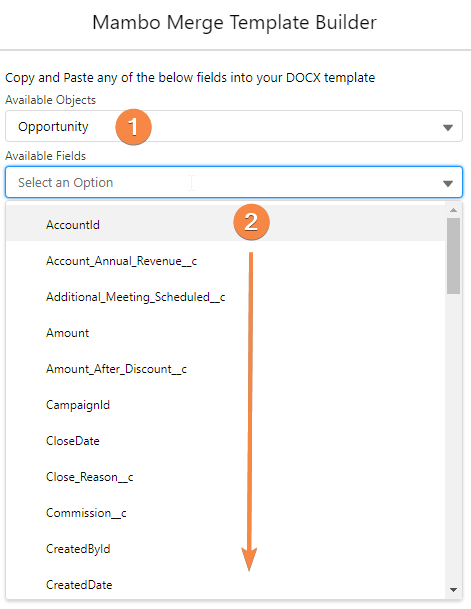
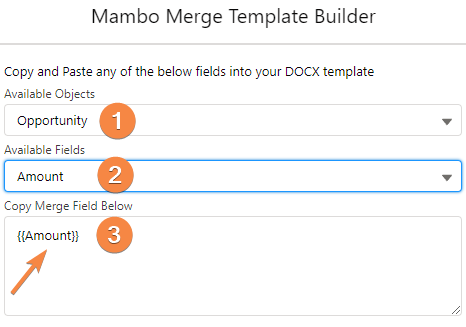
Copy and paste the appropriate merge field within your document and continue to do so until your document is complete. You can always go into Salesforce and look up the field name in Setup as well, since they are identical. We’re constantly adding functionality and new features so this screen will get more powerful over time.
Upload document and obtain file ID
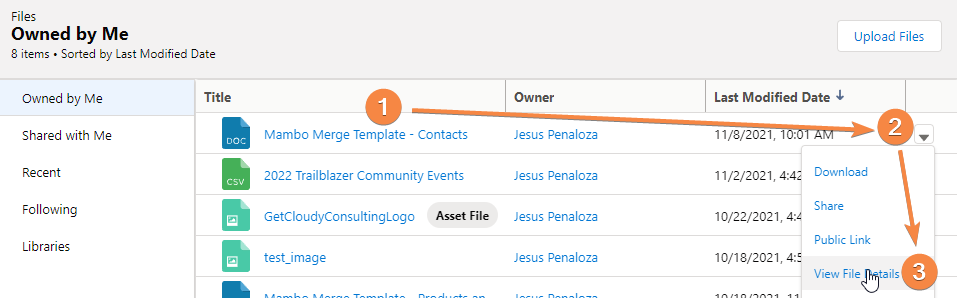
Once we have the template all set up we need to upload it as a file and save it within Salesforce. Head over to the Files tab, upload it and, once uploaded, you will get a nice preview and you can proceed to obtain its file ID. The best way you do that is by locating your file in the Files tab, clicking on the file’s down arrow and selecting the View File Details.
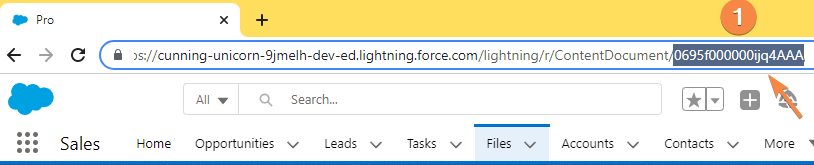
On the file detail screen, look at the URL at the top of the page. Those numbers and letters at the end there are the file ID Salesforce will reference. Copy the file ID found there and, if you’ll need your clipboard in the meantime, be sure to paste that File ID somewhere handy for use later.
Create merge button within Mambo Merge instance
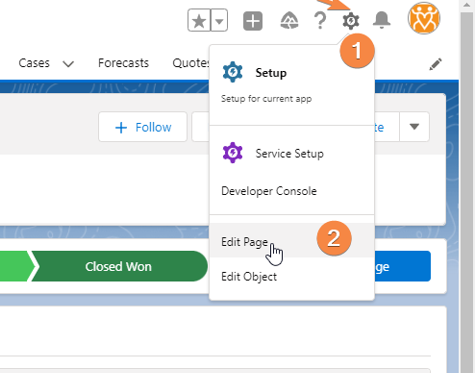
Now, we’ll walkthrough adding a button to a Page Layout that contains Mambo Merge (as opposed to the default drag-and-drop functionality). In our case that means heading back to the opportunity record (but you’ll want to navigate to whatever record type you have Mambo Merge installed on). With the default set up, we can upload or drag and drop a file to generate a document. However, for this tutorial, we want Mambo Merge to create a “Merge” button to generate a document from our new template, every time the button is pressed. The way we do that is by going to the setup gear and selecting edit page.
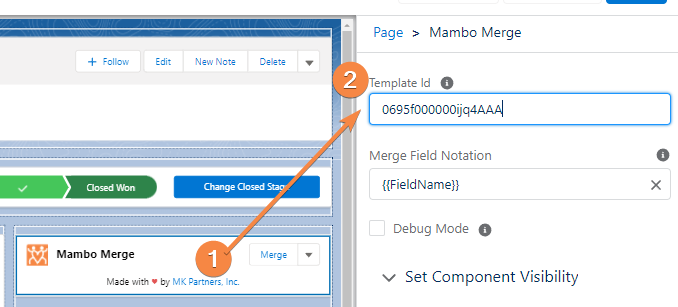
Once that is loaded, click on the Mambo Merge component and paste the file ID (that we copied earlier) within the Template ID field. As soon as we do that Mambo Merge preview is going to change on the screen and display a “Merge” button (replacing the drag and drop functionality). Click “Save” and then navigate back to the record page and we’ll be able to see those changes applied!
Now Mambo Merge knows to use the template provided (by that file ID) every time we press the merge button! Once we click the button, we are taking all that data from this record and the template, putting them all together and outputting the completed document!

And now you’re all set to start using Mambo Merge throughout Salesforce. To create work orders, quotes, or even invoices right from within Salesforce! Of course, if you’d prefer a more live walkthrough of getting up and running, be sure to join our monthly Mambo Merge Office Hours session for a speedy run through of the basics!
As always, be sure to stay tuned here for the latest updates, features, and new developments. Happy Salesforce-ing — and we’ll see you in the cloud.